An ePortfolio methodology for 21st century skills
CULTURAL MATRICES
Practical Work: from knowledge acquisition to knowledge processing
Docentes
Rui Oliva Teles
Jorge Pinho
Introduction
‘By digital literacy we mean those capabilities which fit an individual for living, learning and working in a digital society. For example, the use of digital tools to undertake academic research, writing and critical thinking; digital professionalism; the use of specialist digital tools and data sets; communicating ideas effectively in a range of media; producing, sharing and critically evaluating information; collaborating in virtual networks; using digital technologies to support reflection and PDP; managing digital reputation and showcasing achievements.’ As you know, the teaching methodologies adopted for this UC articulate reflection on the concepts through the presentation and discussion of different concepts, theories and experiences with practical work, in an individual or group context, in order to maximize joint reflection on the existence and intervention of Media in contemporary society, with a particular focus on the implementation of cultural matrices in English.
This methodology is supposed to “develop critical thinking and reflective capacity” and allow the questioning, individually and in groups, of the relationship between theory and practice in the field of Cultural Studies and Discourse Analysis, particularly in Media.
The moments of various content presentation, in which the students should engage in specific analysis of issues and in the discussion of reference authors, shall be complemented by written reflections, and in particular a thematic portfolio, or individual tests, which are essential to achieve the CU objectives. This thematic portfolio is, as you can imagine, the “container” and, at the same time, your identity presence in information society dominated by technology.
In this (practical) component you will develop some fluency in technology operations and the ability to use that technology as a tool to support each of the other components of digital literacy. It is NOT a course in multimedia, although it will require some skills (that most of you already have). Technology is supposed to be transparent and serve our communication purposes. But for that, it seems unquestionable that every student should have access and training in ICT, so that he can express himself in social media, doing what he thinks is the most appropriate, that is, expressing himself.
Beetham and Sharpe’s framework (2010)
Remember some concepts:
- Communication is the meaningful exchange of information.
- Literacy has historically been the ability to communicate through reading and writing. However, a great deal of communication happens without words, using only images or gestures, eye contact, posture — even our daily routine choices of clothing or hairstyle may be a for of communication
- Media Literacy – Although you belong to a “digital generation” To be fully literate you must know the language of digital media. That means you must be able to access, understand, analyse, and produce sound, images, and video you you really want to succeed in your activities or your work.
- ePortfolio – Building an is perhaps the best way to exercise your skills in most usual multimedia tools, while, at the same time you are building you digital identity. They are a good way to demonstrate the advancement and development of student skills over a period of time. Generally, these works considered works-in-progress and include both self-assessment and reflection/feedback elements.
You are going to BUILD a project. Together – because it is also important to know how to work in group. It will be a test on your motivation to ply a significant role in information society, with constructive information and conscious knowledge. You will have to focus on a theme – the one you, as a group . feel that deserves your attention. You will use tools and try to convince your peers (and the teacher) of your arguments. We all know you will do your best.
HOW?
- You have 5 tasks described below and should build them in sequence. The tasks are not scheduled but that doesn’t mean you don’t have to be VERY disciplined and proactive. When your “projects” are completed you will have an evidence of your work in a digital form.
- You will depend a lot on yourselves. But you have all the support from you teacher Rui Teles, whom you can conctac by email or even by phone (914017559). Please be critical, but positive and report to teh teacher any mistake you see in the instructions.
WHEN?
- Projects will be presented in the last lessons od the semester. You will receive more detailed information later.
My ePortfolio
- Creativity and Innovation fluency – Think creatively, construct knowledge and innovate ..
- Collaboration and communication fluency … work cooperative to learn …
- Solution Fluency … think critically define a problem and solutions and make informed decisions…
- Information Literacy … find, analyse and use information appropriately…
- Global Digital Citizenship … understand and practice legal and ethical behaviour concerning human, cultural and societal issues…
- Media fluency – evaluate a message and its medium as well as create original communication…[1]
What do we have to do?
Define your group identity and your theme – organize a group groups of 3 or 4 students that share the same interests in life and choose a topic on which to blog during the entire semester, focusing on a theme you have been discussing in your theoretical lessons with Prof. Jorge Pinho. It is a good idea to create a new email address so that you don’t have to use your personal emails to access the several sites. Besides, when you are creating a Gmail account, you are, also creating several other accounts (YouTube, Google Drive etc)
What do we need?
- You will mostly work in the cloud, but in case you want to have your “assets” safe, maybe it is a to have a pendrive
- To work at the multimedia labs you will need earphones (Sala 21 and 23)
- You will also need a smartphone or a camera and a microphone
WEB PROJECT
Bilding my virtual space
CONTEXT
The best way to make your work “visible” is to build a website. It should be very well planned and with interesting contents, related to the theme the group is following. It must also respect accessibility, usability and esthetical criteria, not forgetting, of course netiquette.
LEARNING OUTCOMES
You will be able to “build” a presence in the web and define a proper template
TASK
- Set up a site in WordPress, Wix, Weebly, Webnode, Blogger or even a Google Website. the design should be representative of the topic[i].
- Build a section “Who we are” – In this page, each one of you will to make a small “biosketch” (100 words) with your picture
- Build a section “what we think”: each student must upload at least 2 (two) 250-500 word blogs either based on a theme of the lessons or on a one given by any recent (within two week) article found on Mashable, Readwriteweb, Huffington Post, or Slate (or other similar page). Remember you can also find lots of ideas and information in Quora or Reddit. Each posting must reference a different article and links (both URLs and contextual) to the article must be present. Overall, each blog will describe the article and provide a thoughtful critique of how it will influence society. Posts must also have a meaningful Creative Commons or free picture (Pixabay, Freepic, etc) . Non-verbal communication and also creativity will be much appreciated: you can use a Pinterest or Instagram account to complement your work.
Optional: If you are going to write your biosketch, maybe it will be a good idea to enrol in LinkedIn account. In that case put the link of your account together with your photo
PROCESS
There are many instructions on the internet about how to set up a site. Wix and Webnode can be the most intuitive (and easy) to build but WordPress is undoubtedly the one with more possibilities. Your presence must be (or at least look like) very professional.
You must pat attention to usability and netiquette rules, accessibility, and pay special attention to author rights. Please study all about Creative Commons and do not “copy and paste” any material.
DELIVERABLE
One group site with one personal presentation (with photo) and 2 texts per student.
IMAGE

Aposter campaign
CONTEXT
A picture is worth a thousand words. For this section you are going to produce a poster. It can be an announcement to an event or simply a poster about the main topic you are talkung about. Just pay attention to some aspects related to visual grammar, or how to communicate with images. No need to call for very professional skills, but creativity will be highly rated.
LEARNING OUTCOMES
By the end of this module you will be able to build a poster or any other graphic representation, using the most usual bitmap tools.
TASK
For your “poster” you will take an original photo and assemble raw images that have a creative commons license. Using Photoshop, or any other program, you will employ a variety of editing techniques and mix the images into a multi-layered 11” x 17” image. You will then publish the images on Flickr with appropriate descriptions and credits.
PROCESS
- LEARN – how to use Photoshop[2] or any other image editing program. You have access to CC in Lab 23 or you can use GIMP
- SHOOT – and upload one or more original photos to Flickr. You can use your own smartphone or a high-end camera.
- FIND – one or more copyright -safe images to combine with yours. Remember you can only use CC licences that allow derivative works
- EDIT- your image and mix 2-4 images together to produce a multi-layered image Your project must have 1100x 1700 pixels in landscape or in portrait at least on original photo, an image with a filter, text with an effect, a shape or a line.
- DOCUMENT- Save a screen capture of your image project including the layers’ panel and upload it to Flickr
DELIVERABLE
A 1100×1700 pxl poster, a link to the cloud site[3] you have chosen and a small description of the image and the options you have chosen in the section “how we see it”
ASSESSMENT
Creativity is a must, of course
* ** You may use a different media sharing site, but it must allow public access to the media and there must be a way to embed it on a page in your ePortfolio.
AUDIO Projet
Interview (SOUND)
CONTEXT
Knowing how to handle a voice recorder and using it for your academic work is perhaps something you haven’t thought about, but if you really want to be skilled you’ve got to know how to do it. Sound data is, sometimes, as important as image when you want to convey a meaningful message.
LEARNING OUTCOMES
By the end of this module you will know how to capture, edit and publish a voice recording with more than one track. After successfully completing this project you’ll be able to produce a video combining a spoken narrative and a soundtrack.
TASK
You will interview someone related to your project. Alternatively, you can interview someone from the school, preferably an Erasmus Student (or any of your peers) about a meaningful positive experience. Make sure you don’t have long descriptions. Short stories are always more interesting.
PROCESS
- LEARN -about sound editing (tutorials available) or make sure you know how to do the things covered there.
- RECORD a spoken voice. Use a tape recorder, or even your smartphone to record a short interview (2-5 min) Record in a quiet place and pay attention to the volume level. Excessive noise or distortion are not acceptable. Identify yourself and the topic at the beginning. Include credit for the music at the end.
- FIND – locate copyright-safe music for a soundtrack; it must have a Creative Commons (CC) license that allows derivative works. Good places to look include Vimeo Music Store, ccmixter, and Jamendo.
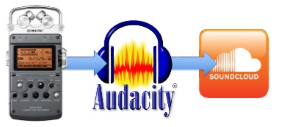
- EDIT – use Audacity* to edit a recording Fade in at the beginning, fade out at the end Incorporate a music soundtrack for part or all of the project (all the way through or just the beginning and ending) If necessary, amplify the voice track or remove noise from it. Reduce music track volume, if necessary, so voice is easy to hear. Export the final project as an MP3 file. Keep all project materials until receiving confirmation of your badge.
- DOCUMENT – save a screen capture of your entire Audacity* project time line. This will show how you assembled the project. Optionally, you may upload the image to Flickr or another image sharing site
- PUBLISH – upload your sound to SoundCloud. The description on the SoundCloud page must include credits for the music: title, artist, and URL.and publish the screen capture in your site.
DELIVERABLE
An Mp3 file published and credited in Soundcloud and a picture of the waveform process in the site.
ASSESSMENT
Sound quality, edition skill and, of course the quality of the interview will be rated.
VIDEO Projet
Documentary
CONTEXT
Video is, as we all know, is a fantastic tool. Anyone can, on these days, shoot and edit very easily , even with a smartphone. Video can be very helpful in your academic work, evem to illustrate your presentations.
LEARNING OUTCOMES
By the end of this module you will be capable of building a short video documentary, with credits e transitions, and upload it for streaming in any cloud server
TASK
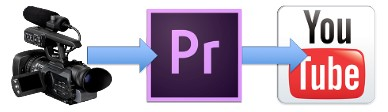
You’ll capture original video. The footage will include establishing, close-up, medium, and long shots. You will also find a music soundtrack with a Creative Commons license. You’ll use Adobe Premiere elements (room 23) (or any alternative software to produce a 2-3-minute persuasive video related to your topic, or any other aspect of society that you would like do document. Your production will include an opening title, still images, closing credits, and three kinds of transitions. You will export the final product as an MP4.
PROCESS
- LEARN – Or make sure you know how to do the things covered here. There are lots of tutorials (Try Linda.com)
- SHOOT – capture some original video. We don’t expect pro quality, but excessively dark, jumpy or blurry video is not acceptable.
- FIND – locate copyright-safe music for a soundtrack; it must have a Creative Commons (CC) license that allows derivative works. Good places to look include Vimeo Music Store, ccmixter, and Jamendo.
- EDIT – use Adobe Premiere* to produce a video with minimum settings: 1280 x 720 resolution, 30 frames per second and include Titles – opening and closing and Fade from black at beginning, fade to black at the end – At least three scenes (not a single uncut video clip) with Music soundtrack for at least 10 seconds. Save in 720p format.
- DOCUMENT – save a screen capture of your entire Adobe Premiere* project time line. This will show how you assembled the video. Put it in section “What we saw” with a brief (150-250 words) reflection on the project, including what worked well, what was challenging, and what you’d like to learn more about.
- PUBLISH – upload your video to YouTube or Vimeo. Description box must include credits for music, video and images. Include title, artist and URL for anything you did not create. If your music track’s CC license included the SA (Share Alike) option, then your video must have a CC license with that same option.
DELIVERABLE
An Mp4 file containing a 2/3 min shooting, published and credited in Youtube or Vimeo and a picture of the editing process in the site, with brief description of the process and the product
ASSESSMENT
Image quality, editing skills (credits, transitions, effects, etc) and overall quality of the project.
PRESENTATION
In the last lessons you will will be asked to present your work and your points of view. Remember: the more you invest in your work in early stages, the easier it will be for you to present it in the final stage. You will have 10 minutes per group to show your work and explain all relevant aspects regarding the “making of” your projects. Projects will be peer assessed, that means you are invited to to the best you can for your peers.
You will present your video and your “What I Have Learned” Statement during the last 2 weeks of class. Your peers will grade your presentations.
As I said, presentations should be 10 minutes long: these 10 minutes should INCLUDE the playing of your video. Be very mindful of time
PRACTICE your presentation. If you are in a group, each member should present equally. Here is a list of things you may want to cover*):
- Why this topic interested you;
- What books, articles, etc. informed your critique/video;
- Any stories of technical difficulties;
- Any elements in your video that we should be paying particular attention to; what parts of the video you’re particularly proud of;
- What you learned from this experience;
- If you partnered up with someone, what responsibilities you took on in the project (IMPORTANT)
- Any further reading people may want to do related to the topic
- You also may want to make your presentation interactive, where you ask questions of students and get them to think critically about your topic.
* maybe you don’t want to cover everything on this list, and you may want to talk about ideas beyond this list…so keep in mind this is just to prompt your thinking
- [1] Components of Digital Literacy are adapted and compiled from the following three resources
- International Society of Technology Educations Student Standards
- Texas Essential Knowledge and Skills for Technology Application
- 21st Century Fluencies Developed by the Global Digital Citizenship Foundation
- [2] You may use other software (The GIMP, etc.), BUT you must still make a screen capture image that shows the layers involved in assembling the project.
- [3] You may use a different media sharing site, but it must allow public access to the media and there must be a way to embed it on a page in your ePortfolio.
